I feel quite advanced sharing this with you, but I finally feel like I'm good enough at something in the cake decorating world to share a "how to" with you. Today's "how to" is "how to make a daisy from gumpaste/flowerpaste". They must be quite simple, otherwise I wouldn't be sharing with you! They're the ones I used on this cake.
You need:
Gumpaste/flowerpaste - one colour for the petals and a smaller amount of another colour for the centre. Note that you should probably wear gloves when colouring gumpaste as it will stain your hands!
Daisy cutters in two slightly different sizes
Roller, preferably a proper, acrylic decorating one
Decorating tool with one rounded end and one pointy end - looks a little like a pencil. I think it's called a scribing tool. Or maybe a cone tool. Or something. I don't know. Don't listen to me!
Soft icing sugar and dusting pouch
Work mat
Thin, dense foam pad
CMC glue & small paint brush (dedicated to cake decorating, one hopes!)
Sanding sugar to match coloured fondant for daisy centre.
1. Knead your gumpaste until it becomes soft and pliable. Dye as needed. Set aside and keep covered at all times when you are not working with it.
2. Dust work surface with soft icing sugar/icing mixture (note that this is not always gluten free).
3. Roll gumpaste out until it is slightly transparent.
4. Cut out pairs of flowers (one larger, one smaller), making sure to press the innermost edges and give them a good wiggle to make sure it cuts cleanly. You should then flip the cutter and run your finger around the cutting edge to get rid of any little gumpaste wormy bits, before gently tapping the flower shape out/poking it gently with a paintbrush. If your cutters are plastic and new (or haven't been used in a while), you will probably need to gently bend them outwards, i.e. holding the outer edges and with the non-cutting edge facing downwards, gently bend innermost edges upwards. If that makes sense! Note also that if you are cutting multiple sets at one time you should be sure to cover them immediately with plastic so they don't dry out.
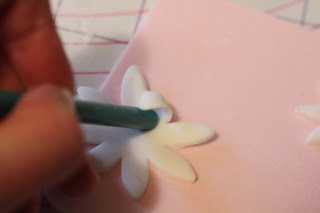
5. Place a pair of petals on your dense foam block and gently but firmly run the rounded end of your pointy tool thingie from the ends of each petal on both flowers in towards the centre (but not quite all the way). Make sure there are no rough bits of plastic where the tool was injection molded otherwise it will rip the petal and you'll have to start over. You'll probably have to start over again at some point anyhow, because it takes a while to get into the swing of things and get the thickness of the gumpaste and the pressure of the tool right!
6. Paint a bit of CMC glue into the centre of the larger flower and place the smaller one on top of it, angling it slightly so that the petals alternate.
7. Make a small ball, a little smaller than a pea, with your second colour of gumpaste. Lance it on the pointy end of your tool thingie, paint it with CMC glue and roll it in coloured sanding sugar. Note that the stuff I made was home-made - I just used regular white sugar and put a few drops of liquid food colouring and smooshed it around with the back of a teaspoon until it was evenly distributed, then spread it to dry on some greaseproof paper on a tray. It's a bit clumpier than the commercial stuff but I think it worked just fine.
8. Paint a bit of CMC glue into the centre of the smaller (top) petal and place the ball, hole side down, onto it and press lightly. Transfer your completed flower to a tray dusted with more icing mixture to dry. You could also use those flower moulding cups, but I only had three and I didn't really like the angle they set on.
9. Once dry, attach a flower to your cake using CMC glue - don't go overboard otherwise it will slip, and hold it in place for about ten seconds until it stays where it's put. The half-opened ones around the base were dried in the cup side of egg carton (dusted with icing sugar), and the ones around the side were dried on the flat underside of the egg carton lid (again, dusted with icing sugar). Unless I specifically need them to fit into a tight corner (like the ones around the base, which are glued to and propped up on a ball of fondant that is in turn glued to the cake), I will probably just dry them flat in the future as I quite like how they sit. But if you want a variety of stages of blooming then experiment with propping them up on things by all means!
Feel free to comment if you have any questions. I don't purport to be the Yoda of Gumpaste Flowers by any means, but I was successful with these ones and felt that I should spread the love! Next time I might tell you how to make those frills. Maybe.


Love it! I was contemplating a gumpaste daisy class that is coming up at the cake decorating place in town.
ReplyDeleteThey're dead easy! I wouldn't normally advocate teaching yourself (because I'm so terrible at it) but it's pretty hard to go wrong with these, so if you miss the class then give it a go anyway :)
Delete