Showing posts with label decorating. Show all posts

Monday, 17 December 2012

Christmas Baking: The Sneak-Peek!

Howdy!
 
It's been a crazy, crazy week. That's the nature of the couple of weeks pre-Christmas, and this time around I squeezed five Christmas-related meals in between Tuesday and Saturday evening *pats food baby* On top of that, I was at work at 6:30am every day, spent about twelve hours there, and spent two of those days outside in 35-40oC heat. Suffice it to say that, come Friday, I was a little tiny bit exhausted.
 
But, being pre-Christmas, I had baking planned for my Friday night (plus making a salad for Saturday's Christmas lunch, which I will hopefully get around to posting before Christmas - it's a broccoli salad, and a surprisingly tasty one. Probably not much good for the Christmas dinner table for those in the Northern hemisphere, but for us Down Under it would go down well). The baking plan kind of failed when the supermarket neglected to deliver a couple of key items, and I ended up driving up to the supermarket to get them. D'oh! So I only ended up making the salad on Friday night, and it wasn't until I got home at 9pm Saturday night that I began my baking. 220-ish biscuits in four hours ain't bad!
 
Because I'm so wrecked and need to be in bed within ten minutes, I'll post the easy one. It's easy because I've made them before - it's the recipe for Margaret Fulton's Christmas Spice Biscuits that I made for my cousin's engagement party.
 
This time, instead of making pretty snowflakes and stencilling royal icing onto them, I made Christmas trees and piped royal icing on and glued some bits and pieces on instead. I used Heather's recipe for royal icing from her Sprinkle Bakes book (and I have to say, I don't think I've seen "stiff peak", "soft peak" and "flood" icing described so well before, so I recommend the book if only for that!). 
 
It's more or less as I remember mum teaching me - two egg whites, a little lemon juice (2 tsp in this case), 3c sifted icing sugar (NOT soft icing mixture) plus half a teaspoon of whatever essence you want to use (I used peppermint this time). Once I had beated the heck out of it on low speed and achieved stiff peak icing (it stands up on its own) I then took half a silicone spatula's worth out (hah! What a detailed measurement!), dolloped it in a small bowl, coloured it using gel colour then added a single drop of water using a dropper, stirred it around and tested it (the peak now flopped over on itself) I imagine if you're using liquid colour you should DEFINITELY add it before the water because it may, in itself, water the mixture down... but as I said, that's what I imagine! Check your facts first, because it's a lot easier to water royal icing down than it is to thicken it up again.
 
This is me piping, and obviously getting distracted by having to take a photo with a DSLR with my left hand - note the big blob of icing coming out!
 
This is what I call Piping Grip - it's how I choose to hold the piping bag, and works well for me. You cradle the twisted part of the bag between your thumb and index finger and apply pressure with the remaining fingers. I've also been taught another way - use your two little fingers to keep the bag twisted, then rest the fat end of the piping bag in your palm - but I feel like I have more control this way.
 
60-something biscuits, plus the mixing bowl soaking my red piping tip (note the pink water!).
 
And now I've made them pretty, with cachous (mind your teeth!) and candy-cane shaped sprinkles (which actually taste like peppermint) which I seem to recall I got from Baking Pleasures (although they don't appear to be in stock at present, which is kind of a moot point anyway because they're closed for Christmas!)
 
I can't decide which I like better - the red
 
or the green?
 
I think the green ones are more appropriate, but the red have more of a visual impact when you're presenting them. Plus I seem to recall reading that "cool" colours and neutrals dull the appetite, whereas brightly-coloured foods stimulate it. Not that anyone is likely to be dissuaded from eating a biscuit based on the colour of its icing!
 
 
Stay tuned for recipes for the other biscuits in this box. The boys at work ain't gonna know what hit them!
 

Thursday, 6 December 2012

Why Do I Do This To Myself? Alternative Title: Amber’s Wedding Cake. Second Alternative Title: I Am Apparently Incapable of Getting to the Point in an Expedient Fashion.

Hey! *waves* I’m back! I had an utterly fabulous time on my round-the-world adventure, which I will tell you about in dribs and drabs, but for now I’ll get back to what (I imagine most of) you come here for – pictures of cake, and food.
The food will have to wait, although I do have a super-quick and easy recipe for a guacamole-esque concoction derived from some ingredients found in the back of my fridge that I’ll post later in the week. Or next week. You know, when I get around to it.
So as it turns out, I just realised that I’m telling you a little bit about my holiday. I’m setting the scene for the sweat and tears that went into this cake (no blood, luckily. And whilst I can’t guarantee that no sweat literally made its way into the cake – it was really hot when I made it – I think it was fairly safe!), because I feel like it needs to be told. Call it catharsis, if you will. If you want to get straight to the point, though, just scroll down to the bottom. I'm totally okay with that J
Sunday morning – Stone Town, Zanzibar. My alarm beeps at me at 0540EAT, the last possible moment I could have set it for to allow for maximum sleep (was up until midnight packing). I wearily pull the mosquito net back, dive into the shower (not much point – it’s hot already) and run up the stairs for a quick breakfast before I hit the road winding alleyways. Swinging my stuffed-full pack and second bag I purchased yesterday just for souvenirs onto my back, I zig-zag my way through the quiet streets to the bustling ferry terminal. There, I fill out more paperwork to leave an island that insists it is its own nation but isn’t, not quite.
I nap a little on the two-hour ferry ride back to Dar Es Salaam, but barely, and I arrive groggy and bleary-eyed and headachey. At the other side a man in a fez and a hi-vis vest accosts me and ask if I need a taxi to the airport. I warily eye the security pass around his neck before deciding he looks genuine. “How much?” “45,000 shillings.” “I was told 30.” Pauses --“Yeah, okay.” He takes hold of my bag and leads me through the crowd… where he palms me off to another, much larger, fez-adorned fellow. “This man will take you,” and he hands him my bag unceremoniously. Hmm. Not sure about this, but he has my bag now. At least it only has my souvenirs in it.
I delicately loop my pinkie around the strap, ostensibly so as to not lose him in the crowd, and he leads the way. After fending off other drivers it seems that he’s the real deal, so I relax a little and let go of the strap. He leads me into the parking lot full of taxis… and opens the door to a not-taxi. I sigh inside, but realise my options are limited as I haven’t seen any drivers for the other taxis, one of which is parked across the front of the not-taxi, blocking it in. I wonder if we will have to wait for its driver to move it, but my driver seems confident that all is well. He swings my luggage carelessly into the back seat, pulls his keys out of his pocket, and uses them to start the taxi blocking our way. Perhaps it belongs to the original driver and it is some sort of security measure… who knows.
Driving through the backstreets of Dar early on a Sunday morning is an eerie experience when you’re still not fully convinced you’re in a taxi. I try to make small-talk but it’s limited by the fact I don’t really speak Swahili, and he doesn’t speak much English. I constantly check my watch. He said it would take about half an hour, which seems right for your average early-morning trip to the airport, any major city, any country, but you want to make sure you’re on track. After fifteen minutes winding through the dusty backstreets – things are slowly waking up now – we reach an intersection and he switches off the engine while we wait for the lights to turn green. I wonder if we’re going to run out of fuel. The lights go green, and we turn onto a well-made highway, replete with beautifully manicured grass, flower beds and flags – just like the road to the airport in any major city, any country. Yep, we’re definitely on our way to the airport. I’m not going to get murdered today!
Three and a half hours early for check-in, I sit on my bag against a wall and daydream. Next to me is the document check point for one of the airlines, and in a very short space of time I see some interesting things. An Indian guy tries to convince the airline that his passport is genuine - his photo and name are on separate pieces of paper, heat-sealed onto the first available page of his passport with what appears to be an aging piece of Glad-wrap. It is peeling at the edges, and claims that passport control did it to him on the way in, but I’m not sure who would buy that. The airline man eventually shrugs and says it’s up to passport control. I wish I knew what happened after that.
An American girl tries to leave the country without a Yellow Fever certificate. She starts whining loudly – that ear-splitting noise that I had long-ago assumed all Americans make, all that time… until I actually visited the States and realised that those obnoxious tourists I saw all over Europe are not at all representative of the general population, and that I have only formed that assumption because the only Americans I noticed were the loud, conspicuous ones. I guess you could say the same for the "drunk Australian" label, which (rarely) applies to me! No, most Americans are actually really friendly and warm, and don’t complain constantly or hurt your ears or jangle your nerves when they speak. Who knew!!! Apparently the girl has not only had her vaccinations, but she is also a doctor, and so she completely understands that she needs a certificate… except that she doesn’t have it on her and needs them to let her through anyway. She simply has to get on her flight. She HAS to! (Of course she does.) The airline staff are patient and refrain from rolling their eyes as they summon the airport doctor to sort it out. They go off together and the girl comes back smiling half an hour later. Ones presumes they either located her certificate or gave her another jab, but how someone who is a) a doctor and b) has actually had the yellow fever vaccine would not realise that you have to carry the certificate when you travel is totally beyond me.
Once I check in and pass security I find myself something to eat with the last shillings in my pocket. At the terminal cafĂ© I eye up the pie warmer full of pastries, and choose the thing that sounds least likely to breed bacteria – a cheese pie. The cheese pie arrives and I discover that it has something resembling a hot-dog, or maybe Devon lunchmeat, running down one side. I consider how much bacteria something that’s probably not actually meat could possibly contain, take two bites of that side then think better of it and eat only the pastry around it.
I get on the plane, have an uneventful flight, pass transit security in Johannesburg, get my passport stamped and head for the SA Airways lounge where I have a shower and rehydrate. I briefly consider eating something, but I’m beginning to feel quite nauseated. I take a muffin and pop it in my bag for later. The food selection was pretty appalling, anyway, but the shower was amazing.
When I get to the gate, the airport staff have decided to do a manual bag search, as if they haven’t already X-rayed our bags twice. I reach the front of the line and the lady asks for my liquids and gels. I have a bottle of water (purchased inside the terminal), deodorant, moisturiser and eczema cream. She regards me with small, glinting, shady-looking eyes as I go through my bag and only shows interest in the deodorant, which confuses me, but I hand her my moisturiser anyway. She asks where my snaplock bag is. Well, I don’t have one. I just came from Tanzania where you don’t need one and as such they don’t hand them out. “Can’t I just carry them through?” (They let you do that at such major airports as LA, and New York, and at Heathrow, you see) “No.” “What?? What’s the difference between having a snap-lock bag and not having a bag??” “You can’t take them on board.” “But…” Defeated, I move to one side to drink my bottle of water.
 As I finish it off I find a snap-lock bag in my carry-on and ask the man at the gate if I can get my stuff back. He tells me it’s up to the lady who searched my bag. I ask her where my stuff is and she looks at me with her glinting eyes and says “I don’t remember you”. Bullsh!t. I’m a 6”2” woman who just argued with you. You remember me, lady!!! Another passenger takes me by the arm and leads me to the side and points to the bin where they place the confiscated items. “They do this all the time,” she says. “Just ask security if you can duck back there and you’ll get your stuff back.” They let me through and I rummage through the bin. I come up with my $40 moisturiser immediately, but the $2 deodorant – the really important item for an international flight – is nowhere to be seen. When the evil lady notices I’m back there she causes a fuss and makes me leave. B!tch has totally stolen my deodorant. I know she has. I start to rage-cry and the man handing out duty free shopping gives me a friendly grin, says it’s alright and that things will seem better when I get on the plane and have a sleep. I think just his smile made me feel better. I stop sobbing and write an angry Facebook status update. At least they have free WiFi, like, EVERYWHERE in the world (you really need to lift your game, Australia!).
I had failed to convince the airline to give me an exit row seat – it would seem that the somewhat diminutive members of the South African Lawn Bowls Team need them more than I do, including one guy who apparently needs an empty seat next to him as well – but once on the plane I am delighted to discover the seat next to me is empty, too. Which is just as well, because I am now beginning to sweat and feel seriously ill, and nobody wants to be seated next to the pale, nauseated person. I clutch my cramping stomach with one hand and the sick bag with the other, and the stewardess eyes me warily during her safety presentation. I fall asleep quite suddenly during our ascent, and wake up an hour or so later, feeling magically awake and cramp-free. During the flight to Perth I doze in all sorts of creative positions across my two seats and eat quite delicately so as to not upset my stomach again. I arrive, feeling surprisingly refreshed. My ankles aren't puffy, either, which I suppose I can attribute to the extra seat space. Yay!
Waiting for my luggage in Perth it seems like mine is the last bag to come out. I spend the time considering whether they did actually through-check my luggage from Dar like they said. The sticker on the back of my ticket says so, but I am skeptical. I rehearse what I will say to the baggage staff when my bag doesn’t show up. It involves mentally moving the wedding I am attending forward by two days and needing them to pay for a new cocktail dress (which is actually in a box with the cake decorating stuff down in Harvey – as if I’d have carried a dress for nine weeks - but shh!). Then my bag shows up, and I pass Customs quickly. This confuses me because I ticked “yes” to the “have you been on a farm” question – they normally scrub my shoes down when I come home. I have been on safari; walked on farmland in the UK; ridden horses in Guatemala; and trekked through jungles in Mexico and Guatemala. I really think they should have cleaned my shoes…
I pick up my hire car and make the two hour drive down to Harvey in the stinking heat. I check into the motel (and only then realise how much I’m spending on accommodation) and lie down for a much-needed rest (if you aren’t a long-term reader you might not know I sufferfrom a heart condition that seems to worsen when I don’t get enough rest, so this isn’t purely jet-lag I’m worried about). I’m too tired even for a shower.
Approximately 35 minutes into my planned 90-minute nap, my phone rings. It’s the bride. The baker’s apprentice who was supposed to have baked the cake hasn’t, and isn’t going to. She’s scared she’ll stuff it up, even though it’s industrial packet mix with clear instructions on the front. I grind my teeth, say “no worries” and pull myself out of bed. It takes far longer than it should to grab a shower and drive 500m down the road – nearly an hour, in fact – but I get there. Knowing I’d be baking for 3-4 hours in a hot bakery, I dress in sensible shoes, a light, knee-length skirt and a loose T-shirt. Not your traditional baking clothing, but damn it was hot.
I meet the bride at the bakery and shows me around. The apprentice is nice but chats to me incessantly, and I’m trying so hard to gather my concentration to make sure I don’t stuff up the mix. Somehow I manage to politely carry on a disjointed conversation while I grease the tins and make the cake, then I wait and wait and wait for them to cook, which is actually kind of a pain the bum when you’re making three differently-sized cakes and only have a rough idea of how long they will take to cook. While I wait I talk on the phone to my mum who is over the moon to hear my voice, and have a few frustrated conversations with other people. I’m so tired, and I just want to sleep, or cry, or both. I pull myself together and go back inside to chat to the apprentice and to eat a cupcake (you’ve gotta do something with that leftover mix!).
At 10:20pm my cakes are on the cooling racks with a tea-towel and a written warning protecting them, and my gear is packed up to keep it out the way of the morning baking. I head to the bride’s house for some reheated dinner and a glass or two of bubbles. At about 12:30, some 24 sleepless and sweaty hours after I got up to catch the ferry, I am finally headed for bed.
My body wakes me up at 7am and I don’t know why. I am exhausted. I lie there, trying to sleep for a while but not succeeding. I rise at 10:30am and for some reason it takes me two hours to eat 
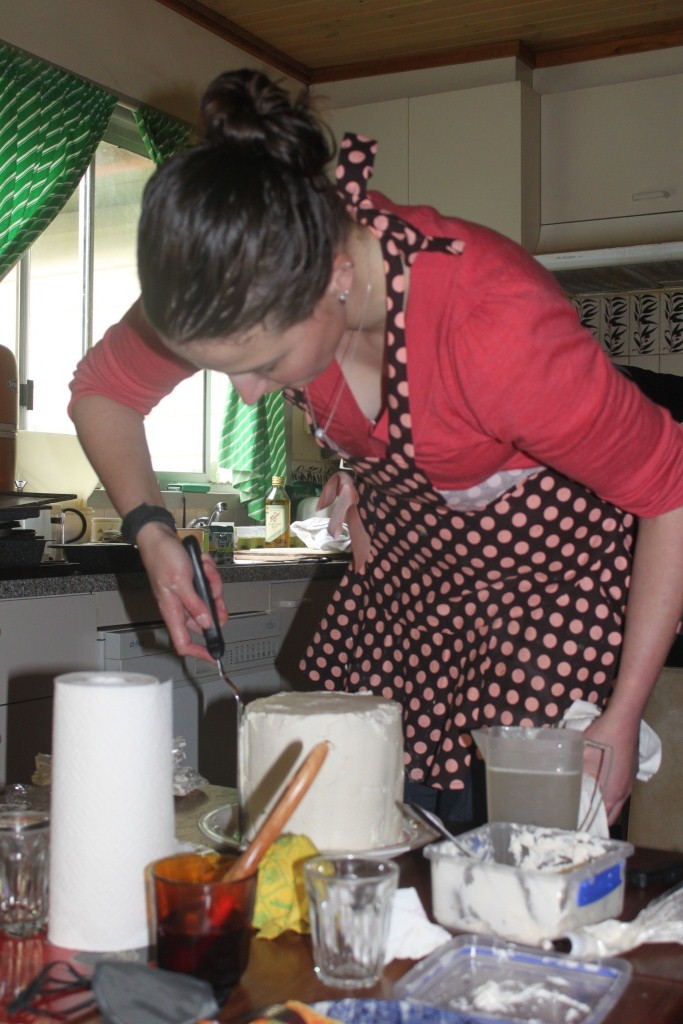
some breakfast, have a shower and get to the bakery to decorate the cakes. I spend eight hours levelling, filling, dowelling, chilling, crumb-coating and covering cakes with fondant. My fondant skills are a little on the basic side, which is why I offered this cake as my wedding gift – to give myself a chance to practice. The first two cakes went okay, and then I put my thumb through the fondant on the larger one and had to start over. Next, I glued black fondant to white and white to black. The three layers looked a bit average as they sat there, unfinished and unstacked. I left the bakery, hoping like hell that assembling and finishing the cake would improve the situation and hide those defects that often only the decorator notices.
I decide to assemble the cake before the wedding, and not between the wedding and the reception as originally planned. Good thing I made that choice, otherwise they would not have had a completede cake! And
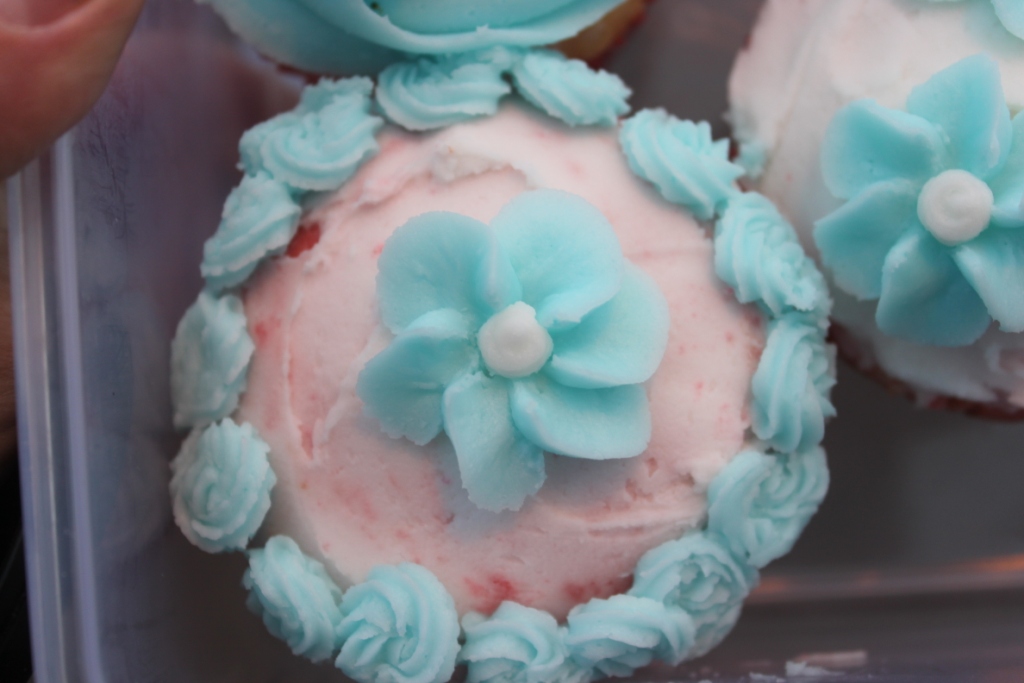
 here it is:
Nobody noticed the defects. Everybody loved the cake. It wasn’t too dry, as I had feared. One tier was probably a little moist, but non-bakers probably wouldn’t have realised. And I will never, ever, ever make a three-tiered, fondant-covered wedding cake for free again. Especially not interstate (accommodation and equipment freight really add up). And ESPECIALLY not on my way home from a round-the-world holiday!!!
So here are some tips for you (okay, we) novices:


1) Don’t underestimate your value. Even if you’re a beginner, you should never, ever work for free, with the possible exception of the cake being your gift. My latest decorating instructor looked horrified when I told her what I was doing (and this was before the cake had evolved – see Item 2), and asked whether I’d work as an apprentice anything for free, because it amounts to much the same thing (the answer should be no, people!).
2) Establish exactly what you’re agreeing to make before commiting to it. The original brief was a “two-tier, white buttercream cake for a relaxed wedding for about 30-40 people. The theme is black and white with accents of red and purple, and I’d like it to be decorated with Cornelli lace.” See my Pintrest board for some brainstorming on that theme (username vanessalillian). To me, covering a cake in buttercream is a cinch, and Cornelli work isn’t that difficult. And I can pipe borders just fine, too. No problems. But then, shortly before I went away, it evolved into a “four-tier, square, black and white fondant-covered, topsy-turvy cake for 70-80 people. I want stripes, spots, diamonds… and can you make it bleed when we cut it?” After that evolution, I panicked and consulted the lovely Heather Baird over at SprinkleBakes.com who has decorated a cake or two in her time, and she graciously (via Twitter) helped me through how I would explain to the bride that I wasn’t going to make what she wanted me to, and that I hadn’t budgeted for what she was now asking for (especially as the cake was free and what she now wanted was worth about $6-800 retail). In the end I just told the bride that I hadn’t covered many cakes and that I was certain that a topsy-turvy cake wouldn’t end well, especially a square one (pointy cakes being notoriously difficult to cover with fondant). The round, non-topsy-turvy cake was much easier but still cost a motza... but meh, practice is practice and I spent more on freight and accommodation than the actual cake!

3) Establish your price early on. It **could** be free (if it’s a gift), but people need to realise how much it costs and what goes into it. You may wish to just ask for them to cover the cost of the ingredients, or give it to them at a discounted rate, or, depending on how close they are(n't), just charge them for the cake! Think about hour hourly rate at work! Your time alone is worth something!

4) Leave yourself plenty of time. I knew I could bake and decorate the cake in the time I had allowed, but knowing that didn’t make it any less stressful. You don’t want to be rushing it. If possible, bake the cakes ahead of time and freeze them (thaw them a couple of days ahead to make sure they’re okay!), or, if you are seriously time-poor, organise for a bakery to make the cakes for you.

5) If you’re decorating the cake somewhere other than home, mentally go through the steps of making the cake and write down what you need. Then, “make” the cake again in your head and “pick up” (in your head) your tools/ingredients from your list as you go. You’ll soon realise if you’ve missed something. When you pack the gear, tick things off the list as you pack them and then enclose the list in the box. It will give you a sense of calm and security later on! If you’re doing it interstate, you can either freight the box or treat it as your luggage if you’re flying. If you already have luggage, buy a second piece of excess baggage ahead of time online – it’s usually a lot cheaper than doing it per kilo at the airport, and is generally a one-off cost for a set weight limit. Just make sure the box is within the specified dimensions and is taped up super-well, and densely packed so things don’t rattle around and bend or break.

6) Figure out where you will be baking. I was lucky enough to be given space in a commercial bakery which was good when you're short on time - e.g. having a commercial oven and coolroom at your disposal, plus a large work surface, really makes things run more smoothly. What I'm saying is, know what facilities you have. Will there be enough work surfaces? How big is the oven and will you be able to bake all your cakes at once or will you stagger them? Will there be enough fridge space free for you? Etc.

7) Take good photos of your cake. I only have iPhone photos of this one, and, whilst they’re decent shots, I’m still really annoyed at myself. Try to remember that every cake is part of your portfolio, and cruddy photos make the cake look cruddy.

8) Most importantly, have fun! This was originally a hobby; an artform; something you loved; remember??!

HUGE, ENORMOUS DISCLAIMER: The bride was not a bridezilla, nor is she a horrible person or was she especially demanding. This post is intended as an educational and entertainment piece for those aspiring cake decorators out there, who may find themselves in a similar situation. Most bakers and decorators will learn very quickly that the general pubic has absolutely notion of what work and cost actually goes into a cake, and they are not to blame for that; it is what it is, and it is something that we will regularly come up against. With time I will learn to deal better with it. In this situation, as mentioned above, I was willing to cop it on the chin and chalk the entire thing up as a learning experience, because I needed just that - more experience. But I am now in a place where I am infinitely more confident with my decorating abilities and will certainly approach the next cake much differently!

Thursday, 6 September 2012

Flower Making Tutorial: Gumpaste Daisies

I feel quite advanced sharing this with you, but I finally feel like I'm good enough at something in the cake decorating world to share a "how to" with you. Today's "how to" is "how to make a daisy from gumpaste/flowerpaste". They must be quite simple, otherwise I wouldn't be sharing with you! They're the ones I used on this cake.
 
You need:
Gumpaste/flowerpaste - one colour for the petals and a smaller amount of another colour for the centre. Note that you should probably wear gloves when colouring gumpaste as it will stain your hands!
Daisy cutters in two slightly different sizes
 
Roller, preferably a proper, acrylic decorating one
Decorating tool with one rounded end and one pointy end - looks a little like a pencil. I think it's called a scribing tool. Or maybe a cone tool. Or something. I don't know. Don't listen to me!
 
Soft icing sugar and dusting pouch
Work mat
 
Thin, dense foam pad
CMC glue & small paint brush (dedicated to cake decorating, one hopes!)
Sanding sugar to match coloured fondant for daisy centre.
 
1. Knead your gumpaste until it becomes soft and pliable. Dye as needed. Set aside and keep covered at all times when you are not working with it.
 
2. Dust work surface with soft icing sugar/icing mixture (note that this is not always gluten free).
 
3. Roll gumpaste out until it is slightly transparent.
 
4. Cut out pairs of flowers (one larger, one smaller), making sure to press the innermost edges and give them a good wiggle to make sure it cuts cleanly. You should then flip the cutter and run your finger around the cutting edge to get rid of any little gumpaste wormy bits, before gently tapping the flower shape out/poking it gently with a paintbrush. If your cutters are plastic and new (or haven't been used in a while), you will probably need to gently bend them outwards, i.e. holding the outer edges and with the non-cutting edge facing downwards, gently bend innermost edges upwards. If that makes sense! Note also that if you are cutting multiple sets at one time you should be sure to cover them immediately with plastic so they don't dry out.
 
5. Place a pair of petals on your dense foam block and gently but firmly run the rounded end of your pointy tool thingie from the ends of each petal on both flowers in towards the centre (but not quite all the way). Make sure there are no rough bits of plastic where the tool was injection molded otherwise it will rip the petal and you'll have to start over. You'll probably have to start over again at some point anyhow, because it takes a while to get into the swing of things and get the thickness of the gumpaste and the pressure of the tool right!
 
6. Paint a bit of CMC glue into the centre of the larger flower and place the smaller one on top of it, angling it slightly so that the petals alternate.
 
7. Make a small ball, a little smaller than a pea, with your second colour of gumpaste. Lance it on the pointy end of your tool thingie, paint it with CMC glue and roll it in coloured sanding sugar. Note that the stuff I made was home-made - I just used regular white sugar and put a few drops of liquid food colouring and smooshed it around with the back of a teaspoon until it was evenly distributed, then spread it to dry on some greaseproof paper on a tray. It's a bit clumpier than the commercial stuff but I think it worked just fine.
 
8. Paint a bit of CMC glue into the centre of the smaller (top) petal and place the ball, hole side down, onto it and press lightly. Transfer your completed flower to a tray dusted with more icing mixture to dry. You could also use those flower moulding cups, but I only had three and I didn't really like the angle they set on.
 
9. Once dry, attach a flower to your cake using CMC glue - don't go overboard otherwise it will slip, and hold it in place for about ten seconds until it stays where it's put. The half-opened ones around the base were dried in the cup side of egg carton (dusted with icing sugar), and the ones around the side were dried on the flat underside of the egg carton lid (again, dusted with icing sugar). Unless I specifically need them to fit into a tight corner (like the ones around the base, which are glued to and propped up on a ball of fondant that is in turn glued to the cake), I will probably just dry them flat in the future as I quite like how they sit. But if you want a variety of stages of blooming then experiment with propping them up on things by all means!
 
Feel free to comment if you have any questions. I don't purport to be the Yoda of Gumpaste Flowers by any means, but I was successful with these ones and felt that I should spread the love! Next time I might tell you how to make those frills. Maybe.


Monday, 27 August 2012

Cake Decorating Class: Wilton Gumpaste and Fondant, and How To Fill A Layered Birthday Cake

I didn't realise until yesterday just how long it has been since I posted here, and I only realised because I offered to write a guest post over at magnetoboldtoo and then my head exploded when I realised how much time writing even a short post can take, especially when it involves pictures and links. At the time of publishing this my guest post hasn't gone up yet (I didn't write my blurb in a timely fashion due to the below festivities), but I'm sure it will be in the next week or so and will let you know when it's out there. It's about how chokos are the knobbly, green symbol of my overcommitting myself.
 
Don't be a choko.
 
But I didn't drag you all down here to chat about chokos (although I will be posting about what I did with that choko some time in the near future. It will probably be entitled Chokos: A Very Confusing Vegetable).
 
Nope, I dragged you down here to tell you about the cake I made for my BFF Emma's 30th birthday. There will be another post that comes later, telling you all about the other three classes I did leading up to the final class of Wilton Gumpaste and Fondant (where I made the bottom tier of this one), but for now I'll just show you the finished product from the final class and take a quick moment to admire the cake before I tell you a bit about what went into it.
 
The brief was "I WANT A PINK BIRTHDAY CAKE!!! PINK, I TELLS YA!!! PINK, PINK, PINK!!!" (disclaimer: the phrasing of the cake brief in no way resembles what came out of the birthay girl's mouth, except maybe the words "pink" and "cake").
 
So I decided that it was going to be pink, inside and out, dagnammit! And a little bit of food dye goes a long, long way.
 
It took a little while to get the shades different enough from one another, and you also have to use your imagination because the colours develop when you apply heat and time.
 
So I now had two four-layer cakes. Baking multiple layers is a bit time consuming and so unless you really love the person you're giving a layer cake to, or they're paying you for your time, I'd probably go down the path of a single cake that has been torted in the future. Or maybe swirls. Swirls would be okay.
 
There are no pictures of how to cover the cake because it all happens too quickly and requires both hands, but I will tell (and show) you how to fill a cake: 1) Pipe buttercream around the outside of your cake layer to create a "dam";
 
2) Fill the "dam" with your filling of choice (in this case it was white chocolate and raspberry ganache in keeping with the PINK theme);
 
3) Sandwich the next layer on and press down gently and turn slightly; 4) You may wish to refrigerate it to set it a little, or put skewers in taller, multi-layer cakes to prevent them from sliding - just make sure that whoever cuts the cakes is aware that they are there!
 
This is the tier I covered at home. The problem I had encountered during class - the corners cracking because the fondant on the sides dragged it down and I didn't catch it in time - was not one I repeated in this tier. My corners were just fine. Unfortunately, the sides were not. They kind of wrinkled and I don't know where I went wrong or how to fix it. If anyone can let me know how to prevent wrinkles that would be super! My instructor didn't tell me how to deal with them because they simply didn't happen to anyone while she was watching. Maybe it's because it was a taller, narrower cake. I don't know *sighs* On the plus side, I now knew which side the back would be! I also made the mistake of covering it in relatively poor lighting, and, upon examination in daylight, found a couple of air bubbles that it was too late to fix. Oh well, live and learn.
 
The board is covered with fondant (Lesson 3) and the daisies were taught in Lesson 2. The frills were taught in Lesson 4, along with how to stick the cake to the board (CMC glue and a couple of small balls of fondant).
 
Altogether I am fairly pleased with the cake. There was quite a bit of damage in transport, and I think next time I make a multi-tiered cake involving frills I will have to apply the ones on the top layer at the venue (or else transport it already assembled. This makes me very nervous!). I also have to be less clumsy with my hands - I kept knocking it when I was decorating because I'm not terribly spatially aware. Be especially careful with your tools, and, until you're quite practiced at it, I suggest removing rings, too. And that row of three daisies weren't part of the original plan, but some frilling fell off in transit so they're hiding the damage were always supposed to be there.
 
Onward and upward!

Monday, 23 July 2012

Wilton Decorating Course - Flowers and Cake Design

You may recall that I quite recently completed the Wilton Decorating Basics course at the Greensborough Cake Decorating Centre (whoah, that's a lot of links!). Well, the next logical step was to enrol in Wilton Flowers and Cake Design. As discussed previously, the Wilton way isn't the only way, or necessarily the best way, but I personally respond well to that sort of instruction.

This course was held over four weeks and, again, we built up our skills and ended with a pretty cake at the end. Because I'm lazy I will just post photos of the flowers we learnt (piping flowers in royal icing has always been something I wanted to know how to do), and a picture of the finished cake.

First up, we learnt to make these cute but crazily annoying button flowers out of gumpaste, using a mould. There's quite a good chance I won't use the mould again, and, that if I do, I will quite likely swear and throw it across the room at some point - the flowers have a propensity to stick (although you do eventually get the hang of poking them out of the mould without destroying the flower). But if someone really wanted these cute button-style flowers, well I guess I'd make them again... after a calming drink or two!*

Next was a pansy, again from gum paste. We were taught to use a balling tool for this one. I'm not a big fan of the pansy - I found it to be quite an ungainly flower - but perhaps that has more to do with my clumsy hands than anything else. It might look nicer a little smaller, too.

After that we learnt to make royal icing - you can read about it until the cows come home, but until you've actually seen it I think you'd pretty much just be lucky to get the consistency right. I've done it as per instructions three times before, and improved each time but still not had the desired result. But once I saw it demonstrated it was okay. The key is, it should defy gravity! But if you need to use your #1 tip then you should be thinning it down, otherwise you have no hope of pushing it through that tiny hole.

The next few flowers were variations on the same theme - apple blossoms,

primroses (don't ask me why it roatated the picture... also, I think my pink icing was a wee bit runny, and I should also mention that most of my flowers had a small accident on their way home so they're a bit smooshed),

daffodils (my favourites! Can't wait to make them with orange centres), and

violets.

We also learnt to make a Wilton rose
(the full seven outer petals)
(only five outer petals)

and an oriental lily (mine's a bit wonky, but that's because my brain is incapable of dividing an invisible circle into six even pieces. This is one I'd love to improve on!).

Lastly, we were taught reverse shells and ropes (ropes are used below, although not good ones!)
and basket weave, to make the final product upon which we stuck the flowers from earlier classes.

Again, I will show you how to make these at some point when I'm less lazy, but I reiterate that there is no substitute for a proper class. I strongly urge you to find one near you!

*the author in no way advocates the use of alcohol as a sedative or other mood-altering device to assist in the more frustrating steps of cake decorating. But advocating and casually suggesting are two quite different things, right??

Monday, 25 June 2012

Rainbow Cake

All the cool kids are doing it. And I'm not talking about smoking pot or getting your belly button pierced or giving *cough* unnecessary levels of affection to boys at parties or drinking bourbon/vodka/whatever the week's "in" drink is until you spew or pashing your bestie's boyfriend.

No. We've (okay, they've - I was never a cool kid) all reached a higher level of maturity now (one hopes) and baking is cool again. Did ya get the memo??

(I would like to go on the record as saying that I was baking before it became cool again, so perhaps it is I who is responsible for the resurgance... Yeah, I don't buy it either...)

And these ladies are doing it in style -
Rosie, aka Sweetapolita
Susan, aka ChocolateSuz
Kaitlin, aka Whisk Kid


If you happened to click through you'll notice a glow that I think Kaitlin started and Rosie fanned into a healthy flame. Actually, Martha made it really famous but Rosie brought it to the forefront of the bloggy world, as far as I'm aware. (And, on the side, how awesome would it be if Martha found something she liked on my blog and re-published it??? That would be AWESOME!!!)

That's right, I'm talking about the rainbow cake. It has been on my 101 Things list, mocking me, for around 350 days... And I finally made it! It was for my BFF Kaye's birthday and due to a few dietary issues amongst the consumers I made it gluten and dairy free. So yes, I was a Betty Crocker Cheat because hey, when you need to muck about dividing your cake batter into six precise batches and then dye them you don't really want to be mucking about with from-scratch baking. Actually, I was a Basco Cheat, but let's not split hairs.

2 boxes of Basco sponge cake mix, 6 eggs, 1c water, 200g dairy and gluten free white chocolate, 1 small carton lactose free cream (UHT), 1 bag frozen raspberries, 1 tub Nuttlex and 2 bags pure icing sugar. Oh plus essence of your choice to make the Nuttlex buttercream you will make taste less feral. And food dye - I have the Americolor student kit.

Make up cake mix, divide into six bowls evenly by weight, dye whatever colour you want (I went red-orange-yellow-green-blue-purple, using my Americolour student kit, and put about 2 drops in each, with the exception of the purple/violet which I added a drop of fuschia to in order to give the colour a bit of depth), and cook in pairs in greased, lined sandwich pans (I used industrial Pancoat but assume the usual grease/line business is the go. Follow the directions on your cake mix box!). Bake for about 30% less time than the mix specifies, because the cake is much smaller and will dry out much faster.

Meanwhile, make the ganache. Heat up cream until bubbles form, then remove from heat/microwave and add chopped white (lactose free - Woolworths stocks it, at least, they do online) chocolate. Allow to sit for a moment, then stir until of a consistent texture. Now, I was winging this step so there was a bit of trial and error involved. I ended up tipping off a whole lot of cream that I shouldn't have, and ended up with a solid mass when I left it overnight. So, back to square one and luckily I had a second carton of lactose free cream on hand! I used about 1/3 of the second container so I imagine you need at least 1/2 a container, if not 3/4. Anyway, allow this to set in the fridge. It shouldn't be rock solid, just pleasantly thick and stirrable. You can whip ganache which was my original plan, but my first lot was too hard and the second lot was too runny!

Meanwhile-meanwhile, defrost the packet of raspberries (i.e. leave on the bench) and once they've thawed, cut the bottom corner off the bag and balance it on a heavy whiskey tumbler (or similar) to drain the juice out. Once that's done, add the raspberries to your white chocolate ganache and smoosh around. Resist the urge to eat it because even though it's lactose free and has that distinct, sweet, soy flavour about it, it still tastes really nice!

Meanwhile-meanwhile-meanwhile, make up some buttercream. Mine was dairy free, using about 2/3 of a tub of Nuttlex and close to 2 bags of pure icing sugar. I was too lazy to sift it so I didn't. I just whipped the Nuttlex up with it and kept adding icing sugar until it tasted right and had the texture I wanted (fairly fluffy). I also added a big spoonful of vanilla bean paste to take away the icky Nuttlex flavour, which gave my cake a grainy, rustic finish which I quite like.

Brush cooled cakes with a bit of the raspberri juice to moisten them (because I bet you overcooked it like me). Don't go too nuts - you don't want soggy cake. Then, using a #12 tip (large-ish round), pipe a dam with buttercream because you know your ganache is too runny to stay put!

Use 1/5th of the raspberry-white chocolate ganache per layer. Repeat the process, starting from the bottom layer and working your way up (purple-blue-green-yellow-orange-red) like so: brush with juice, pipe a dam, fill the dam with ganache, add the next layer. Repeat. I cheated in coating the cake because I have a large plastic piping tip that looks a lot like the narrow slot hairdryer attatchment which makes it far easier to cover the sides of a cake - you pipe the icing on, and then smooth it out. Have a friend take a photo of you smoothing icing at the kitchen table which is clearly too low a work surface for you, where you can't quite tell which part of the photo is in focus but suspect it may be a polka dot on your apron.

Decorate with cute li'l flowers you learned to pipe in royal icing the day before. (I'll write a tutorial on that one day, I promise!) Admire your handiwork.

And when you cut into the inside, prepare to be amazed. Even though you know exactly what's inside you will still be amazed.

Now, don't forget that you need only eat a verrrrrry skinny slice, because it's basically two cakes stacked atop one other. And you'd better believe that people will volunteer to bring cake home with them, and that all that will remain is a shattered, desolate slice.

Not to bad for gluten free, lactose free cake! And now I've checked another thing off my 101 Things list. Whoohoo :)

Thursday, 24 May 2012

Wilton Cake Decorating Course - Decorating Basics, Week 2

Following on from last week's class at the Greensborough Cake Decorating Centre, we built on the skills that we had already learnt.

The first thing we did - besides spending an hour prepping our icing - was learn to pipe shells. Apparently this is the hardest thing you can learn, after properly smoothing a cake. It took me a while ot get the hang of it, but I got there in the end!

We also learnt to make drop flowers, which are a heckload easier than they look, and decorated cupcakes with them in various ways.

(I had to include one of the wrapper, cos they are just so darned cute!)

Once we had decorated the cupcakes, it was time to learn to make ribbon roses and turn our attention to the masterpiece - our cake.

I'm still feeling a little smug about the fact that I finished my roses a good ten minutes before the rest of the class. They're not that hard. I may sing a different tune when it comes to more complex things, but a ribbon rose is a walk in the park for me.

This is my completed cake. I have a way to go yet in controlling my dots and stopping them from turning out spiky, but I quite like the overall appearance. You know what they say - practice makes perfect!


Next week we're decorating novelty cakes. I'm doing a flower pot with flowers in it. Could be interesting...