Showing posts with label gluten free. Show all posts

Tuesday, 11 June 2013

"It's All Relative" Healthy Chocolate Brownies

Quite some time ago I made Chocolate Heartache Cupcakes which used eggplant as a base, and were flour and butter free. They were so incredibly rich and moist and dense that the thought of applying the whole eggplant-as-a-baked-goods-base concept more broadly has been playing on my mind ever since.
 
It was inevetable that my thoughts would turn to inventing a brownie that was (gasp!) healthy. I mean, who wouldn't want to be able to eat brownies, relatively guilt-free?? I carefully crafted the recipe over several days' driving to and from work (50 minutes each way. Why yes, I DO devote a lot of time to thinking about food, why do you ask?) and was finally ready to test it on the guinea pigs at work execute the magnificience that is these brownies. Inevitably I made some changes on the fly to improve the texture, but that was always going to happen.

And lo and behold, these healthy chocolate brownies were born. Relatively healthy, anyhow!
 
INGREDIENTS:
1 medium eggplant
1/2 large zucchini
1 banana
1 block Club chocolate (180g)
2 large dollops honey (it's probably close to 1/4c, but to me it was using a dessert spoon and doing two huge spoonsful)
3tbsp cocoa powder
1 1/2c ground almonds
1tsp vanilla extract
1/2c choc chips
1/2c pecans
 
Prick eggplant all over with a fork and place in a covered dish in the microwave with a little water in the bottom. Steam for 4 minutes. Flip over, and steam for a further four minutes. Allow to cool enough to handle, then chop the top and peel skin off. Mash or blend until relatively smooth and set aside.
 
Grate zucchini. Squeeze as much excess moisture out as possible. Add to eggplant mix.
 
Mash banana. Add to eggplant mix.
 
Melt chocolate. Add to eggplant mix.

Mix in honey, lightly beaten eggs, cocoa powder, almonds and baking powder until you have a consistent mixture.

Transfer mixture into a greased baking dish or tin and bake for about 50mins at 180oC until set.


Note that you will likely find it quite difficult not to eat several pieces at once. If I were you I'd do what I did and bring it into work!
 
EDIT: It helps them hold together if you refrigerate them overnight once cool. I cut the lines in before refrigerating, and then just cut over them again before serving. Also, I'm quite sure those are the quantities but the question has now been raised in my mind. When I get home tonight I'll find the envelope I wrote the recipe on and correct if need be!
 
EDIT #2: If you have copied this recipe out before the 23rd of June 2013 then the quantities are are a little out of whack and there are a couple of things missing. Obviously I found the envelope I wrote it on this morning and am editing it accordingly. Sorry if I stuffed up your brownies! Best you try again ;)

Monday, 15 April 2013

Review - The Junk Food Cooking School, Docklands, Melbourne

A couple of weeks ago I had the pleasure of being asked to join my friend Tanya in a Vietnamese cooking class on a Chinese junk (formerly a brothel moored in Footscray, now casually moored in the harbour at Docklands). Tan's husband, you see, had quite obligingly suffered a bout of gout that week and so I was chosen as the person who would most appreciate it. And boy, did I appreciate his pain. Thanks, Mark! :)
The Junk Food Cooking School is run by a lovely woman named Hazel, and there are classes on various cuisines available throughout the year. I wanted to attend the Mexican class quite badly, but I'm being moved to a FIFO roster at work and am not sure which weekends I will be available to fly back to Melbourne, so I guess I'll have to let that one slide for now. Boo :(

In the meantime, I have done the Good Morning, Vietnam! cooking class and discovered just how simple (and healthy) Vietnamese food is. Because it's been a while since I posted a recipe I'll post my favourite one, but if you want the rest of them you'll jolly well have to attend the class ;) I don't have any qualms in posting this as similar recipes are widely available on the internet and so there are no trade secrets being given away, but I do encourage you to go along to a class. You'll be glad you did.

Two things struck me about the food we cooked: One, even though we made seven different dishes (including dessert), I wasn't completely stuffed full - the food was light, and not at all greasy; and two, the same ingredients were used again and again - chilli, lemongrass, fish sauce, sugar, salt, pepper, vinegar. So it's really not one of those cuisines where you need lots of fiddly things. I don't know about the rest of you, but I already have all of those things in one form or another in regular circulation in my pantry. Now all I need is a garden with some herbs in and I'll be set.

The classes were well-run, and Hazel was open to questions about dietary requirements etc. She has herself been recently diagnosed as caeliac, so I do know that at least the cooking class I did was gluten free and I wouldn't be at all surprised if some of the others were, too.
Our class had around ten people in it, and there was a cooking/prep work/demo table at one end of the junk and a dining table and chairs at the other. We were also given a choice of bubbles, wine or beer to drink (plus water, coffee and tea) with our meal, which I didn't expect and which I thought was a nice touch. You could participate as much or as little as you liked, with everyone standing around the demonstration table and Hazel getting people to participate in various ways. As the class wore on we found that the group naturally involved itself and took it in turns, so Hazel didn't have to do too much directing. I guess we had a good group dynamic.
The class lasted four or five hours, including eating the meal and checking out laughing at the buck's night (well, day) boats going in and out of the harbour. You should wear closed-toe, comfortable shoes because you are on your feet for a lot of that time (that, and you don't want to drop a knife or hot oil on your bare foot), but I imagine you could just as easily sit back and watch if you wished. Personally, I'm a more hands-on sort of gal, especially in the kitchen.

Chilli and Lemongrass Curry - The Junk Food Cooking School.
INGREDIENTS:
500g chicken Marylands, chopped into 3 pieces and excess fat and skin removed
1tsp sugar
1/2tsp salt and 1tsp black pepper
2tbsp fish sauce
2tbsp vegetable oil
2 lemongrass stems, white part only finely chopped and pounded, bash remaining ends
2 garlic cloves, crushed
3 birds eye chillies, thinly sliced
90mL water
2 spring onions, sliced on the diagonal
1 bunch Chinese broccoli or other Asian greens
2 birds eye chillis, sliced, to garnish
1/2 bunch coriander leaves, to garnish.

Combine fish sauce with sugar, salt and black pepper. Stir to dissolve sugar.

Add chicken pieces, stir to coat then cover and chill for half an hour.

Meanwhile pound lemongrass in mortar and pestle until it goes powdery. Fry on medium heat until golden.

Pound garlic and add to wok with chilli and cook until fragrant.

Add chicken and marinade and stir-fry for around 10 minutes until coloured. Chicken does not need to be cooked through at this stage. Add water and bashed lemongrass ends and bring to the boil then reduce heat and cook, with lid on, for approx. 20 minutes until the chicken is cooked through.

Just before serving add greens and spring onions and cook a further 2 minutes then serve garnished with chillis and coriander.

It won't look pretty, but you'll be surprised at how rich and flavoursome it is!


We made seven dishes in all - a variation on a rice paper roll, with a prawn and pork sausage in the middle along with herbs, rice noodles and a peanut sauce; sugar cane prawns; pork spareribs braised in coconut water; chicken, chilli and lemongrass curry; coconut rice; green mango salad; and sticky rice to finish off. Today I have shared with you the chicken, chilli and lemongrass curry because it packed such a flavour punch, and also because I was downright shocked that it didn't contain coconut milk - the sauce was just so creamy. It's definitely one going on regular rotation in my kitchen!

Besides the curry we made sugarcane prawns (seen here sitting on a green mango salad)


Pork spareribs braised in coconut water

 Coconut rice

Rice paper rolls with a prawn and pork sausage 

And sticky rice with banana for dessert.
  
What a feast!


 In addition to plenty of food, drinks and a cooking lesson you also get a snazzy red apron as part of your ticket price. Which is just as well because I get an apron grubby just about every time I use it, so multiple aprons are a must in my life!
 I get the impression the classes do book out fairly quickly, so if you want to book several places then plan well in advance. Hazel does run private classes, though, which could be an option for a hen's night or a work function. I'm not sure whether the price is any different, but it would definitely be worth a look. Included in the normal price is the class, the (multi-course) meal, a drink or two, an apron and a booklet of recipes (I assume that applies across the board for all classes), which I think makes it very good value for money. All in all I recommend the Junk Food Cooking School for a nice day out with friends, or as a gift for someone.

Monday, 11 March 2013

Mango and Peach Sorbet

You may recall that I got the ice cream maker attachment for my Kenwood for Christmas. The first thing I made with it was raspberry sorbet, and, having neither the time nor the inclination to faff about with making an egg-cream-custardy-thing to make proper ice cream out of, or to then do something with the egg whites, I decided to make sorbet again yesterday instead of branching out into the grown-up world of proper ice cream. After all, Melbourne is in the middle of ANOTHER week of 30oC+ and I ain't turning no stove nor no oven on for nobody!
 
Sorbet it is. Locate fruit, sugar, liquid of some sort and food processor. Whizz together. And this one's even better than the raspberry sorbet because this time there was no boiling of sugar syrup. Huzzah!
 
INGREDIENTS:
1 ripe mango, peeled, pitted, chopped
2 ripe peaches, peeled, pitted, chopped
1/4c lime juice (that's about the juice of 1.5 limes)
3 heaped tablespoons of icing sugar
 
Whizz it all up in the food processor until smooth. If it's not cool, which it will be if the fruit was in the fridge, chill it.
 
Jump into your Tardis, put the bowl of your ice cream maker in the freezer 24 hours ago (if that's the sort of unit you have, like I do), then come back to the present day and remove it from the freezer and set it up.
 
This is where I say "freeze according to ice cream maker manufacturers' instructions" but in my case, turn your Kenwood/other inferior machine on, pour the puree in and leave it going for half an hour to 45 minutes.
 
Once again I got quite a soft sorbet but I'm imagining that when I pull the leftovers out the freezer tonight I will discover that it is quite solid. (Note: they were. I had to leave them out for ages before I could get the spoon through!)
 
You can add more or less icing sugar to taste, but the amount there was just enough to balance the lime juice and let the mango shine. This was originally supposed to be all-mango but SOMEONE ate the other mango (and it wasn't me, y'all!). Nonetheless I think it was better this way - the peach made it not-terribly-mangoey but sort of supported the flavour without overpowering it. If that makes sense.
 
I can't say which is my favourite because I am inherently biased towards raspberry but it doesn't seem fair to choose the quality of a recipe on what my favourite flavour happens to be, so... if you want something tart and refreshing, possibly to accompany a chocolatey dessert (although it is damned fine on its own), go with the raspberry. If you want to lounge about eating sorbet on a summer's eve then go with the mango (and it has also occurred to me that I could just serve it in a glass and add a splosh (bigger than a splash) of rum to it, just for kicks).

Monday, 11 February 2013

Raspberry Sorbet


I can't remember whether I mentioned it, and I'm inclined to say that perhaps I didn't, but last year I was given a brand spankin' new Kenwood mixer for my 30th birthday by some super-duper-awesome-wonderful people in my life. I admit I was torn between getting a shiny Kitchen Aid, preferably in Rasberry Ice, or a Kenwood. But I grew up on Kenwood mixers, and this puppy has a massive 1500W of power versus the insipid 300W of a Kitchenaid. No contest.
 
So although this is beautiful, this is what I ended up with. Which is also beautiful, but in a different way. I'd be lying if I said I didn't get quite a bit of pleasure out of polishing it yesterday! #whyimsingle
Titanium Major - KMM020
From Kenwoodworld.com. To purchase visit "shop" at top of page
Not only does it have a 1500W motor but it also has a mixing bowl that is 2L bigger than does the Kitchenaid, so in theory I can now make quadruple batches of pavlova in one bowl without it exploding. And, oh, the batches of cake I could make! And the cream I could whip! I have such lofty ambitions :)
 
Anyway, for Christmas, my parents (independently, because they're divorced) gave me cash to put towards attachments for the Kenwood. I had enough for two attachments which are actually quite decent value for money. For example, the Kenwood stand-alone food processor is worth about $400, but the food processor attchment for the mixer was about $130. I guess the theory is that once you have the machine, the money you save on the attachments is about equal to the money (and space) you would save on all the other kitchen gadgetes. 
 
So I counted my little wad of cash and ordered the ice cream maker and a food processor attachments, and they arrived last week. And on the weekend, I used both to make raspberry sorbet, and it was amaaaaazing. You know, presuming you love raspberries just as much as I do! It was more tart than sweet, and made around four servings of two scoops each. I imagine next time I may consider straining the seeds out, but not for sure. I'm probably too lazy to bother, truth be told ;)
 
First, I used the food processor to puree the raspberries.
 
And then I used the ice cream maker to make the sorbet (duh). With this particular unit you put the ice cream maker insert in the freezer for 24 hours before you want to make the ice cream, so it requires a little forward planning, but honestly, if you can't predict that you're going to want ice cream then you're a moron. You could probably just keep it in the freezer all the time, and because it's a bowl you can put your frozen peas in the middle and you won't be losing a whole lot of space in your freezer to it. 
 
Sorry there's not a good shot of it (there are sure to be many more opportunities to take a picture of me making ice cream!), but imagine a plastic-on-the-outside, metal-on-the-inside bowl with a flat bottom and straight sides that sits within your mixer bowl. The cavity between the plastic bit and the metal bit contains what I assume is the same fluid you get in those plastic freezer bricks you put in your esky (as we call it. For those playing in New Zulund an esky is also known as a chully bun (=chilly bin), and for everyone else in the world I think it's known as a cooler or possibly an ice box). The ice cream maker has a clear polycarbonate lid, and that white plastic bit you can see in the middle has a shaft that goes down to the bottom, then splits into two paddles. The two paddles make their way in opposite directions to the side of the bowl where they make a 90 degree turn and move up the sides of the bowl. You can juuust see the top of one of the paddles poking out on the left of the bowl, at about the five-minutes-past-nine position.
 
INGREDIENTS:
350g of fresh or frozen raspberries, pureed
3/8c castor sugar (that's half of 3/4, if you're having trouble picturing it)
1/2c water
1/8c lime juice
 
Dissolve sugar in water in saucepan over low heat, stirring occasionally. Once dissolved, bring it to the boil and boil for one minute. Set aside to cool.
 
Once cooled, mix through pureed rapberries. Add lime juice and mix (I had left the raspberries in the food processor and added both the sugar syrup and lime juice and turned it on quickly to mix them through).
 
Put in ice cream maker and freeze according to manufacturer's instructions. In this case, the brief is to assemble the (pre-frozen) bowl, make sure it all lines up, then turn it on low and THEN pour the mix in. If you do it the other way around it will freeze to the side of the bowl and you will have problems!
 
In my case, it took half an hour for it to become a scoop-able but slightly wet sorbet. Being impatient, I was fine with that. The instructions say most things take half an hour, but to leave it going for up to 45 minutes if it's a little soft, and then if it's still not hard enough then you scoop it out and put it in the freezer. I know that the half of the batch we didn't eat on the first night hardened significantly in the freezer, so I had to let it sit on the bench for a while (the fridge might have been smarter) before scooping it out.
 
Easy peasy! I have to say, I was a little turned off ice cream making by my sort-of-disasterous vanilla ice cream, but I think I'm back in the game. And sorbet is a good place to start because there's no mucking around with eggs making a custard first.
 
What an excellent Christmas present. I look forward to many more interesting ice creams and sorbets! (I have my eye on a honey-walnut ice cream. Mmm...)


Monday, 4 February 2013

Michelle Bridges' Salmon with Char-Grilled Asparagus and Tomato Salad

I thought I'd share a savoury recipe for once. Normally it's all about cupcakes here, but since I have had increasing difficulty buttoning my pants I thought it might be wise to limit my cupcake intake for a time. Don't panic, it's not forever, just until I can fit back into a pair of pants (in the Australian sense, not the British sense!) other than the only two things left in my wardrobe that fit me!
 
So a while ago (hah probably nearly a year ago. Well done, Past Vanessa, for using your new cookbook so much) I bought myself a copy of the Michelle Bridges Crunch Time Cookbook. For the Americans out there, Michelle Bridges is Australia's answer to Jillian Michaels, although probably not quite as hardcore and mean.
 
But she still says some vastly unpopular things that make some women very angry, and there seems to be quite a polarised opinion on her methods, but she's right about a lot of things, and she definitely doesn't sugar coat it (because sugar is the devil. Duh.) - we're not going to lose weight by cuddling puppies or making daisy chains or through positive affirmations about ourselves, and we're certainly not going to do it by eating cheese (mmm, cheese... *undoes jeans button*). But as anyone who read her book knows, she actually does give a damn about the psychology behind weight gain, and does try to address it. So she's mean AND sensible ;) I don't agree with her brand of rapid weight loss because to me it's unsustainable, but it obviously works well for some people.
 
Anyway, to her recipes - last year I wrote a less-than-complimentary review about her Lentil Shepherd's Pie, probably because it was kind of watery, unfilling and a little bit low on taste. That could easily be fixed with some spices, and, as I said, you could probably add a little sweet potato to it in order to thicken it up and bulk it out. Last night's recipe was a bit higher on flavour thanks to the addition of basil and balsamic vinegar, although I suspect it may not have filled me up had I not added the zucchini and snow peas. That's not saying much, though, given what a bottomless pit I have been lately!
 
I'm sorry there are no photos - I was too hungry! - but I think we all know what a piece of grilled salmon sitting on top of a salad looks like.
 
The link to the original recipe is here, but I had to wing it a little because the supermarket was out of asparagus, and we were out of spray oil at home. And also because I feel superior in knowing that you get more flavour out of tearing herbs than chopping them!
 
The original calorie content is 269cal per serve (recipe serves two), but I'm guessing my version was probably closer to 300-325cal thanks to the oil and the fact I used beans (and a larger number of them) plus snow peas and zucchini rather than just a few spears of asparagus.
 
INGREDIENTS:
 
Two handfuls mixed salad greens, washed and drained
Handful of green beans, topped, tailed, halved across, washed
Smaller handful of snow peas, topped, tailed, halved across, washed
1 small zucchini, washed, topped, tailed, sliced down the middle then in diagonal, 1.5-2cm chunks
1 250g punnet of cherry tomatoes, washed
Handful of basil leaves, torn
2tsp balsamic vinegar
2tsp olive oil
2 150g salmon steaks
 
Put salad greens and torn basil in two large bowls.
 
Heat half the oil in a grill pan (I used our old family cast iron frypan instead. It's an amaaaazing piece of kitchenware to have, it's not even the schmancy enamelled type, and it probably cost about $20 from a camping shop). Put the beans in and cook for a couple of minutes, stirring occasionally so that they get a little bit of charring but don't burn.
 
Next, add snow peas and cook for about 30 seconds to a minute before adding the zucchini and tomatoes. Stir occasionally for another minute or two until everything is a little bit brown and heated through. I recommend tasting the zucchini at this point as uncooked zucchini is quite bitter.
 
Remove from heat and divide evenly between two bowls. Drizzle evenly with balsamic vinegar.
 
Return pan to heat with remaining oil. When pan is hot, grill salmon on both sides until lightly browned but still pink in the middle. Serve atop salad. Enjoy! (and I can say it wholeheartedly this time!)
 

Tuesday, 14 August 2012

The Daring Kitchen: Cornmeal (Polenta with Blue Cheese, Sweet Potatoand Basil)

I can't believe another month has rolled around, and I'm also quite glad that Rachael from Pizzarossa chose a challenge that had a bit of flexibility about it and got me excited. Part of the excitement was because Joy the Baker advised me that grits and polenta were basically different grades of the same product, and so recipes for a product that is largely unavailable in Australia suddenly opened up to me! Sure, the texture of polenta is smoother, but they're roughly interchangable and so a whole world of cooking has opened up for me. YAAAAAAYYYY!!! *does happy dance*

Rachael of pizzarossa was our August 2012 Daring Cook hostess and she challenged us to broaden our knowledge of cornmeal! Rachael provided us with some amazing recipes and encouraged us to hunt down other cornmeal recipes that we’d never tried before – opening our eyes to literally 100s of cuisines and 1000s of new-to-us recipes!

I can't remember where I read about it, but I wanted to cook something like grits with blue cheese. I have never been a big fan of blue cheese, although since living in Adelaide and doing a few of those cheese-and-wine trails I have been exposed to fairly tolerable variations on the theme, like a nice, mild Roqueforte (I don't know if I spelled that correctly) rather than that manky, powdery blue stuff. Ugh.

So when my friend Mary introduced me to the most excellent combination of gnocchi with roasted pumpkin and basil leaves wilted in browning butter, with chunks of blue cheese stirred about until all nice and melty and creamy, well, I was pretty darned happy. And relieved. Because blue cheese isn't so bad after all. I can't ever see myself gobbling down that stinky stuff like my mum does, but that bite is quite passable in cooking.

Fast forward a couple of months, and I'm making the polenta equivalent of Mary's dish within a day of reading about the challenge, using what we already had in the fridge. I was just so excited!!!

I should have written down what I put in, shouldn't I... oh well, I'll give it a go!

1 small sweet potato, in 1/2-1" cubes
1tbsp dijon mustard
2tbsp olive oil
Salt and pepper
1/2c polenta
1c cold water
1c hot water + extra
1 rounded tsp chicken stock powder
1/2c milk
20g butter + extra
40g blue cheese + extra
Squeezy basil stuff (or I'm sure torn fresh basil would be nice, too)

Mix mustard and olive oil together until homogenous. Toss sweet potato in it and roast at 190oC for about 25 minutes then flip the sweet potato around and turn it up to about 210oC until a little browner and soft enough to eat (about another 10 minutes but your oven may differ). Ideally I would have used pumpkin as it's sweeter, but this had to do. I wanted to make this dish NOW!!!

Put polenta in medium-ish saucepan (maybe on the large side of medium. I don't know what the official ruling on saucepan size is!) and add 1c water. Stir around then turn on the heat. Boil the kettle, measure out another cup of water and add the stock powder. Stir around and bring to boil. You'll have to really watch it when it comes to the boil because it pops like lava bubbles!

I think at this stage I added the milk and was taste testing it fairly often so I could tell when it was cooked (it will become smoother). It took less than ten minutes from the boil, probably less than eight but I wasn't timing it as I placed priority on not being splattered by hot polenta.

Once it reached the cooked stage I turned off the heat, stirred through some squeeze basil and some butter and cheese. I kept adding those two until I got the desired consistency and flavour.

Mine turned out quite soft and quite wet, but that's how I like it. If you don't want it as wet then maybe reduce the amount of water you add. You could eat it alone or as a side dish - I served it with some left over casserole, which was nice.

Thank you Rachael for a great challenge!

Monday, 6 August 2012

Pad Thai-Inspired Chicken Stir Fry

Hey there Kiddies,

after my last long, rambly post, and seeing as how most of my readers are foody-type people, I have decided to give you a quick recipe to tide you all over until I bake something again!

Last weekend was one of those weekends that are full to the brim, where you rush about all day and then get to about four o'clock and realise you haven't done any shopping, nor have you gotten anything out of the freezer to defrost.

Great.

(Note: chicken fillets defrost far more quickly if you slice them thinly and spread the pieces out a bit. To stop them going all gross and dry and manky, put them in a plastic bag or container with the lid on)

After a bit of a ferret through the kitchen, I came up with a workable solution. It's not a fancy recipe but it does well with few ingredients in the house. I like to fool myself into thinking that it's a little better for you than Pad Thai, but it's probably not, although there is definitely less oil and I used lo-cal noodles. Note - I would not normally have had the lime in the house, but for the fact that I zested a few limes to put in white chocolate, coconut and lime ganache to fill my birthday cake. Yummo.

INGREDIENTS:
Chicken thigh fillets, fat removed, sliced thinly
Crushed garlic
Chilli sauce
Oil
Onion (I used red because it's what was in the house)
Broccoli, cut into small florets
Kale, sliced (an afterthought to add some more greenery, and, again, was in the house/garden)
More garlic!
Chang's super lo-cal noodles, rinsed and drained (although any cooked noodles would do, preferably rice)
Chopped cashews
More chilli sauce!
Brown sugar (approx. 2 heaped tsp)
Fish sauce (approx. 1 tbsp)
Soy sauce (approx. 1tsp)
Lime juice (approx. 2 limes' worth)
Cashews to garnish

I'm sorry but you're going to have to figure out the quantities yourself. It will depend on how many people you're feeding and what your taste buds are like. The dressing/marinade can be adjusted to suit your taste and the quantity you are making up, as can the chilli sauce. You could also add fresh chilli to give it some real zing, and some corriander/cilantro (which I just remembered I had a squeezy tube of and should have used but didn't. AND I have squeezy lemongrass! DAMNIT!!!). This dressing/marinade is also fantastic on a Thai beef salad, but that's another post for another (summer) day!

METHOD:

Heat about 1tbsp oil in a large frypan. Stir-fry chicken with a teaspoonful of crushed garlic and some chilli sauce (you'll need to taste test). When the chicken is cooked through remove from the heat and set aside.

There should be enough oil and juices left in the pan now to fry up your onion (until softened), broccoli (until bright green and heated through/cooked to your liking) and kale (until wilted - obviously add it much later than the other things). Add the chopped cashews and stir, then the drained noodles and mix until evenly distributed (tongs will help). If it starts to stick, add a little water. Add more chilli sauce to taste.

Add the chicken back in along with the dressing/marinade and mix it all through until everything is hot. Serve garnished with whole cashews.

Quick, easy and quite healthy. If you want to cut down on the calories, add more kale and broccoli and less cashews. Those puppies are quite deceptively high in energy!

Tuesday, 10 July 2012

Date and Chocolate Torte

Not so very long ago in a land not at all far away (might have been this very chair, in fact), I came across this recipe on Hotly Spiced, an always-amusing food blog. Charlie is a great story teller, so I find myself popping over a couple of times a week to see what recipes she has up her sleeve and what story she has woven around it.

On this particular day I was suffering a surplus of egg whites on account of the lemon curd and ice cream I had recently made. The single paltry egg white I used for the meringe in that recipe wasn't quite enough to balance out the yolks so I had seven sitting in the fridge, thinking about what they would become (macarons were a vauge possiblity, but I'm still a bit scared of them). So when I stumbled across the recipe Charlie had posted for date and chocolate torte it was like a sign from above. It's from the Vogue Australia Wine and Food Cookbook... 1985! AND it's gluten free.

Preheat oven to 180oC. Grease a springform tin and line the base with baking paper.

Roughly chop 250g of each of dark cooking chocolate, dates, and almonds (skin still on). I used the stick mixer's food processor and found that the chocolate became jammed on the side of the bowl so you could really only chop one row at a time. Quite frustrating! You'll also need to hold it with two hands because once it starts chopping it kind of tap-dances on the bench.

Whip 6 egg whites until stiff peaks form and gradually add castor sugar, beating until it dissolves/disperses. Fold in almonds, chocolate and dates (I did this in a couple of batches so as to not completely flatten the meringue mixture).

Spread in tin and bake for 45 minutes.

Switch off oven, open oven door slightly and allow to cool in tin. If you're not me, once it's cool, turn onto platter, cover and refrigerate overnight.

If you are me, cool for about half an hour then carefully remove from the tin while it's still kind of warm and melty.

Serve it up with a round of double cream and some granny smith apple slithers (I like the tartness to balance the sweetness of the chocolate and dates; I imagine strawberries or raspberries or perhaps even nectarines would also work well).

Thanks for the recipe, Charlie!

PS - I did the maths and it has 338cal per serving (1/12th of the torte), without the cream. Not too bad considering its extreme deliciousness!


Monday, 25 June 2012

Rainbow Cake

All the cool kids are doing it. And I'm not talking about smoking pot or getting your belly button pierced or giving *cough* unnecessary levels of affection to boys at parties or drinking bourbon/vodka/whatever the week's "in" drink is until you spew or pashing your bestie's boyfriend.

No. We've (okay, they've - I was never a cool kid) all reached a higher level of maturity now (one hopes) and baking is cool again. Did ya get the memo??

(I would like to go on the record as saying that I was baking before it became cool again, so perhaps it is I who is responsible for the resurgance... Yeah, I don't buy it either...)

And these ladies are doing it in style -
Rosie, aka Sweetapolita
Susan, aka ChocolateSuz
Kaitlin, aka Whisk Kid


If you happened to click through you'll notice a glow that I think Kaitlin started and Rosie fanned into a healthy flame. Actually, Martha made it really famous but Rosie brought it to the forefront of the bloggy world, as far as I'm aware. (And, on the side, how awesome would it be if Martha found something she liked on my blog and re-published it??? That would be AWESOME!!!)

That's right, I'm talking about the rainbow cake. It has been on my 101 Things list, mocking me, for around 350 days... And I finally made it! It was for my BFF Kaye's birthday and due to a few dietary issues amongst the consumers I made it gluten and dairy free. So yes, I was a Betty Crocker Cheat because hey, when you need to muck about dividing your cake batter into six precise batches and then dye them you don't really want to be mucking about with from-scratch baking. Actually, I was a Basco Cheat, but let's not split hairs.

2 boxes of Basco sponge cake mix, 6 eggs, 1c water, 200g dairy and gluten free white chocolate, 1 small carton lactose free cream (UHT), 1 bag frozen raspberries, 1 tub Nuttlex and 2 bags pure icing sugar. Oh plus essence of your choice to make the Nuttlex buttercream you will make taste less feral. And food dye - I have the Americolor student kit.

Make up cake mix, divide into six bowls evenly by weight, dye whatever colour you want (I went red-orange-yellow-green-blue-purple, using my Americolour student kit, and put about 2 drops in each, with the exception of the purple/violet which I added a drop of fuschia to in order to give the colour a bit of depth), and cook in pairs in greased, lined sandwich pans (I used industrial Pancoat but assume the usual grease/line business is the go. Follow the directions on your cake mix box!). Bake for about 30% less time than the mix specifies, because the cake is much smaller and will dry out much faster.

Meanwhile, make the ganache. Heat up cream until bubbles form, then remove from heat/microwave and add chopped white (lactose free - Woolworths stocks it, at least, they do online) chocolate. Allow to sit for a moment, then stir until of a consistent texture. Now, I was winging this step so there was a bit of trial and error involved. I ended up tipping off a whole lot of cream that I shouldn't have, and ended up with a solid mass when I left it overnight. So, back to square one and luckily I had a second carton of lactose free cream on hand! I used about 1/3 of the second container so I imagine you need at least 1/2 a container, if not 3/4. Anyway, allow this to set in the fridge. It shouldn't be rock solid, just pleasantly thick and stirrable. You can whip ganache which was my original plan, but my first lot was too hard and the second lot was too runny!

Meanwhile-meanwhile, defrost the packet of raspberries (i.e. leave on the bench) and once they've thawed, cut the bottom corner off the bag and balance it on a heavy whiskey tumbler (or similar) to drain the juice out. Once that's done, add the raspberries to your white chocolate ganache and smoosh around. Resist the urge to eat it because even though it's lactose free and has that distinct, sweet, soy flavour about it, it still tastes really nice!

Meanwhile-meanwhile-meanwhile, make up some buttercream. Mine was dairy free, using about 2/3 of a tub of Nuttlex and close to 2 bags of pure icing sugar. I was too lazy to sift it so I didn't. I just whipped the Nuttlex up with it and kept adding icing sugar until it tasted right and had the texture I wanted (fairly fluffy). I also added a big spoonful of vanilla bean paste to take away the icky Nuttlex flavour, which gave my cake a grainy, rustic finish which I quite like.

Brush cooled cakes with a bit of the raspberri juice to moisten them (because I bet you overcooked it like me). Don't go too nuts - you don't want soggy cake. Then, using a #12 tip (large-ish round), pipe a dam with buttercream because you know your ganache is too runny to stay put!

Use 1/5th of the raspberry-white chocolate ganache per layer. Repeat the process, starting from the bottom layer and working your way up (purple-blue-green-yellow-orange-red) like so: brush with juice, pipe a dam, fill the dam with ganache, add the next layer. Repeat. I cheated in coating the cake because I have a large plastic piping tip that looks a lot like the narrow slot hairdryer attatchment which makes it far easier to cover the sides of a cake - you pipe the icing on, and then smooth it out. Have a friend take a photo of you smoothing icing at the kitchen table which is clearly too low a work surface for you, where you can't quite tell which part of the photo is in focus but suspect it may be a polka dot on your apron.

Decorate with cute li'l flowers you learned to pipe in royal icing the day before. (I'll write a tutorial on that one day, I promise!) Admire your handiwork.

And when you cut into the inside, prepare to be amazed. Even though you know exactly what's inside you will still be amazed.

Now, don't forget that you need only eat a verrrrrry skinny slice, because it's basically two cakes stacked atop one other. And you'd better believe that people will volunteer to bring cake home with them, and that all that will remain is a shattered, desolate slice.

Not to bad for gluten free, lactose free cake! And now I've checked another thing off my 101 Things list. Whoohoo :)

Friday, 4 May 2012

Pioneer Woman's Mocha Brownies

Well. I finally did it. After resisting for the longest time due to the crazy amount of butter and sugar in these, I made Pioneer Woman's mocha brownies from her first cookbook.

I just want to say what an absolute hero Ree Drummond (aka The Pioneer Woman) is to me. I stumbled upon her blog via Cake Wrecks way back in 2009 (might even have been 2008...) and I haven't looked back. Not only did her buttery recipes appeal to me, but I also became hooked on the story of she and her husband's romance, entitled Black Heels to Tractor Wheels. You can read it on her blog (I'm having trouble finding the whole lot of them - perhaps the category was removed once the book was published? But at least some of the components seem to remain, so search for Black Heels), or buy it in book form. She comes across as being this lovely, sweet, slightly ditzy woman and is totally relatable in so many ways. It's going to sound really twee, but she made me believe in true love when I was doubting it, and she made me feel kinda normal cos hey, I'm a bit of a ditz myself and I share her love for food and family and friends, too. I love you, Ree!

(No... declaring your undying love to a blogger you've never met isn't weird. At all...)

Anyway, enough babble. To the brownies!

I have scribbled this out on the back of a receipt and am transcribing it on my bus ride back up to Barham, so hopefully I wrote it down correctly. Note that I have written the Australian measurements here, and that I have only included a half quantity of the icing as I (accurately) assessed a whole batch to be a bit over the top. If you want the original recipe, buy the book! Your thighs won't thank me, but your heart will sing with joy. There's this amazing recipe for berry cobbler and... oh, just by the dang book already!

BROWNIES

120g dark chocolate
220g butter
2c sugar
4 large eggs
3tsp vanilla extract
1 1/4c plain flour (I used gluten free flour and they turned out wonderfully)

Preheat oven at around 160oC (325F was what the original said - you may wish to check my conversion!)

Melt chocolate, being careful not to burn. Set aside to cool slightly.

Beat butter and sugar until fluffy. Add eggs one at a time and mix until batter is an even consistency.

Drizzle melted choclate into sugar/butter/egg mixture with the mixer still running. Add vanilla and mix. Add flour and mix until just combined.

Spread into greased 8" tin (I also lined it with baking paper coming up two of the sides to make it easier to remove the cooked brownie). Bake for 40-45 minutes until set in the middle (note that I cooked mine for closer to an hour, but I think the thermostat on mum's oven is buggered - I have ordered an oven thermometer and hope this will assist future recipes!).

ICING

110g butter, softened
2 1/2c icing sugar
1/8c cocoa powder
Pinch salt
1 1/2tsp vanilla extract
1/4 - 1/3c brewed coffee, cooled to room temperature
(optional: coffee essence)

Mix all but the coffee until just combined  in the mixer. Then, add a little under 1/4c of the coffee and whip until light and fluffy. If the mix is too stiff then add a little more coffee. I added some coffee essence at the end because I only used instant coffee and the flavour wasn't strong enough for me.

Spread icing on brownie and refrigerate until set. Cut into 16 slices.

Note that if you cut it into 16 slices, I calculated that there are around 540 calories PER SLICE!!! Yes, really. So I cut it into 25 slices and I feel much more comfortable with my decision to eat two in one day :)

Bon appetit!


Tuesday, 14 February 2012

The Daring Kitchen: Flipping Fried Patties! (Zucchini, Carrot, Chick Pea and Sweet Potato Fritters)

I was ever so pleased when I discovered that this month's Daring Cooks challenge was to make fritters. The last few have been quite, well, challenging. I know that's the whole point - to extend yourself and add to your culinary skills - but once in a while it's nice to have something quick and simple that you can do some serious improv on with what is on hand rather than having to dedicate four hours of your already-busy weekend to locating ingredients and preparing and cooking something quite complex.

Don't get me wrong - I do like to learn new things and make impressive dishes, but this month's challenge is more my style of cooking, and I generally leave the fancy stuff to the realms of baked goods. Like the time I made Sweetapolita's Ruffle Cake. I think I also enjoyed the fact that I didn't feel like I needed to read every single word on the information sheet in order to successfully complete the recipe, or freak the heck out about doing somethign wrong. Which I think means I will always be placed squarely in the "cook" corner, and not the "chef" one!

The Daring Cooks’ February 2012 challenge was hosted by Audax & Lis and they chose to present Patties for their ease of construction, ingredients and deliciousness! We were given several recipes, and learned the different types of binders and cooking methods to produce our own tasty patties!

I'm on a bit of a health kick at present so I wanted to make something full of vegies but also not light on flavour. Audax and Lisa provided a list of common binders for patties, and I decided to go with sweet potato as well as some blended-up chick peas.

I spent a week or so thinking about what to put in these. Not non-stop, obviously (although, given how often I think about food it wouldn't be entirely surprising if that had been the case!), but there was a certain flavour I was going for - there's this Indian stall at the St Andrews Market (a hippie craft/farmer's/trash n treasure market near where I live in Melbourne) that makes these wraps that have this sort of roasted vegetable fritter type thing, wrapped up in Roti and served with chutney and salad. I thought I'd give the Roti a miss (only cos I was cooking for myself and mum, and mum wouldn't be able to eat them because of the gluten, which would leave me to eat an entire packet of Roti... which, let's face it, would be delicious, but not really in line with my current health kick!).

The ingredients are probably fairly flexible - as I'm sure all the other Daring COoks discovered, making patties/fritters is definitely one of those add stuff "until it looks right" propositions!

1 small-medium sweet potato, peeled and steamed/boiled until soft
1 can (400g-ish) chick peas, drained
2 medium zucchinis, grated, liquid squeezed out to within an inch of its life
1 medium carrot, grated, liquid squeezed out
1/2 medium brown onion, grated, liquid squeezed out (that'll test ya! Or, see below note on blending)
2 cloves garlic, you guessed it, grated!
1 egg
Sweet paprika (I added about a tablespoon but add to taste)
Moroccan seasoning (I never do spell that correctly... I used about a teaspooon, but again, to taste)

Blend steamed sweet potato, chickpeas and egg (and if you were too scared to grate the onion and okay with your patties being sloppy, blend that too) in a food processor until it forms a smooth paste.

Add it to the grated vegetables and smoosh about with your hand until combined and the different vegetables are evenly distributed. Add spices and continue to smoosh mixture until well mixed.

Divide into six to eight balls.

Heat olive oil in frypan (I used a cast iron one) and place half the patties in the pan. Squash them so they are about 2cm thick. Fry until browned then flip. Continue cooking until the second side is cooked. Repeat with the other half of the raw patties.

Serve with a garden salad and mango chutney such as my BFF Kirsti made me for Christmas.

Tastes good cold, too! Which is just as well, because now that I can't drive for six months (no, I didn't lose my licence! It's a medical exclusion) and therefore have to catch the bus to Barham on Sunday nights, I have to eat dinner on the bus (without the driver noticing - no food allowed on the bus!). The good thing about catching the bus is that I have plenty of time to blog on my way up. Which makes me feel a little queasy after a while, but I'm beginning to think that's more to do with needing glasses... and now I'm rambling... so, ENJOY!

Wednesday, 8 February 2012

Year of the Cupcake #8 - Valentine's Day Gluten Free Vanilla Cupcakes with Chocolate Ganache Filling

I feel like I'm in a bit of a time warp at present - it seems as though my last batch of cupcakes was ages ago, but in reality it was just two weeks. I think that's more of a reflection on the fact that this month I wasn't in a mad rush to bake them before the end of the month. They just sort of happened, because I felt like baking them, and didn't feel like I was under pressure to bake and blog before the end of the month.

It's much more enjoyable cooking when you're not under pressure. I think the fact that I baked 2 things AND completed my February Daring Cooks challenge (no link yet as the post won't be up until the 14th) all in one afternoon, as well as fitting in a swim, a trip to the movies and some decent time spent curled up with a book, and felt tired but not stressed, really tells me that I enjoyed myself on Saturday.

This month, after the roaring success of last month's GF Chai Cupcakes (they rose! They really rose!), I decided to re-work a recipe for vanilla cupcakes that I had previously attempted to adapt to become GF. The recipe was originally from thecupcakeproject but now that I'm into the second incarnation the recipe is resembling the original less and less. I decided that, seeing as Valentine's Day is coming up, I would decorate them accordingly.

I was hoping the changes I made to the recipe would cause them to rise better, but it didn't seem to make a great deal of difference. They were still flattish, but not sunken, so I guess that counts as a partial success! Then again, I am increasingly filled with skepticism about the integrity of mum's oven. I think I may have to get a thermometer to place IN the oven, because I suspect it's five to ten degrees too cool, so for all I know this recipe could actually be a roaring success. They tasted less like vanilla, too, although in hindsight that's probably more to do with the fact that I loaded them up with chocolate ganache! I dropped a couple when I was turning them out of the pan, which meant they were squashed, so I had to eat a squashed one while it was still hot (you know, in the name of quality control ;) and it did taste like vanilla, so perhaps next time I use this recipe I will ice it with something significantly more subtle.

Also, I apologise for the photos - fading light + having no idea how to photograph glossy brown things in red wrappers = terrible photos!!! If anyone can tell me how to improve this situation I would be much obliged :)

THE CUPCAKES:

Note that the below flowchart is how I normally copy recipes out by hand, so I thought I'd give it a whirl today. If you're struggling with the format, I have written notes below. Each set of ingredients is referred to as "set 1", "set 2" etc. in order down the page.

Now, for a favour - my Statcounter tells me there are regular readers all over the world and I value your input, so PLEASE comment and tell me whether you like this method of copying out recipes, or you prefer the good ol' fashioned method. Everyone who comments will go into a draw to win baked goods (home-made if you're within Australia, or a packet of Tim-Tams if you're outside of Australia). The draw will close on the 17th of February and the winner will be announced shortly thereafter. Get commenting!
And to the notes on the recipe -

Preheat oven to 180oC and line cupcake trays with cupcake liners (makes about 22 Australian cupcakes, give or take).

Combine Group 1 ingredients in a small bowl until vanilla seeds are evenly distributed throughout the sugar. Smells divine!

Whip egg whites (Group 6) until stiff peaks form. Set aside.

Mix Group 2 ingredients together in a large bowl and add combined Group 1 ingredients.

Add Group 3 ingredients to the large bowl and mix until resembling bread crumbs.

Mix Group 4 ingredients together in the bowl that originally contained the sugar/vanilla mixture until even in texture. Add to large bowl and mix well.

Add Group 5 ingredients slowly to the large bowl, mixing on low (you don't want to over-work GF products).

Fold half of Group 6 into the large bowl until evenly mixed, then fold the other half in.

Immediately scoop into cupcake wrappers (half fill) and bake for 14-16 minutes.

Note that the original recipe said 175oC for 14 minutes, but I ended up turning the oven up by ten degrees and baking for an extra five minutes or so once the 14 minutes was over. I think this has more to do with the seals on the oven than the accuracy of the recipe!

THE CHOCOLATE GANACHE:
300mL of thickened cream (the sort you use to whip)
300g chocolate, finely chopped.

Note - I used 200g of dark chocolate and 100g of milk chocolate as this is what I had on hand. Milk chocolate can help take the edge of dark chocolate as dark chocolate on its own makes a very rich ganache. And I just realised why my ganache turned out so sloppy - I probably added a little less chocolate than I had originally intended (oops!), and  the closer to a 1:1 ratio of cream to chocolate, the sloppier the mix and the softer it will remain, even when refrigerated. For a stiffer mix, add more chocolate

Heat cream until bubbles form, dump in the chopped chocolate (make sure it is all submerged), let it sit for a few minutes and then stir it until it forms a smooth mixture.

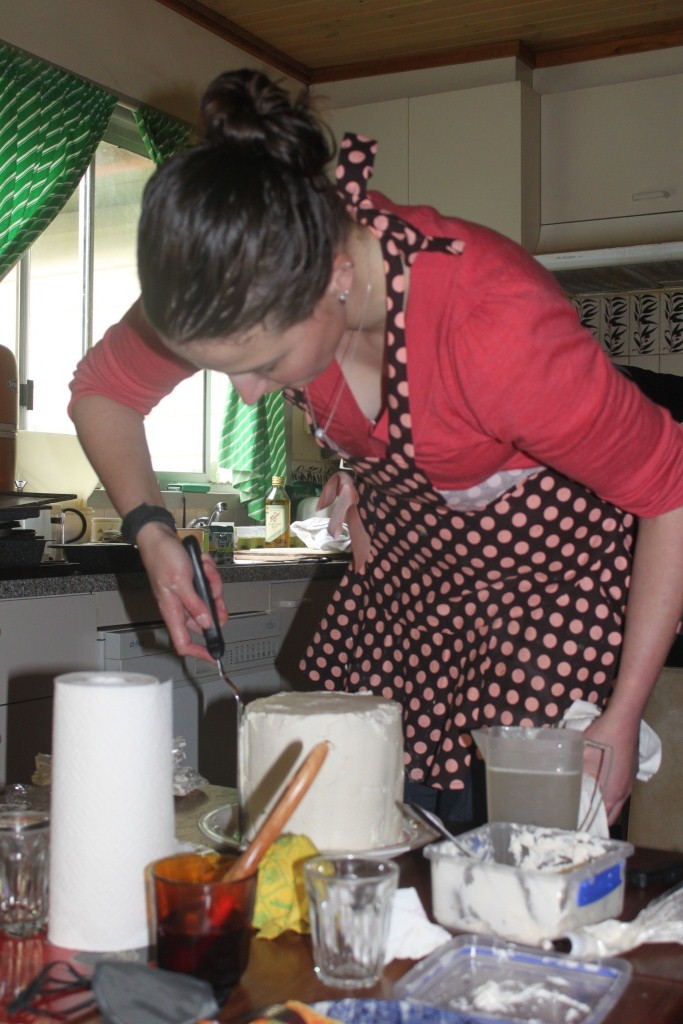
Divide mixture in two. Mixture #1 will be cooled and then whipped, and mixture #2 will be cooled until it thickens so that it is spreadable but not uruly, but do not cool as much as mixture #1. I am impatient so I cooled mixture #1 in the freezer and stirred it every 5 to 10 minutes until it was still just pliable but a little on the stiff side, then whipped it with the whisk attachment on the Kenwood.

While I was daydreaming about ganache on the bus yesterday (as one does!) I realised that this would make a very good chocolate mousse replacement for people who are freaked out at the thought of raw egg (which is in normal, home-made chocolate mousse. I'm sorry if you didn't already know that and it has ruined your love for it!). Aaaanyway...

I then attempted to use this, which I got for my birthday last year from Kirsti. It's a hoover-joover for making holes in cupcakes and then filling them with something yummy.

I don't think I was using it correctly, but it still gave me a good-shaped hole.

I only cut about half way through the cupcake and then lifted the little cake round out with an old-fashioned sugar/jam spoon with a large, rounded end (think soup spoon, but smaller, and decorative)...

...filled them with a spoonful of whipped ganache...

...and then smooshed the tops back on.

Next time I will definitely consider putting the ganache in a piping bag and injecting the cupcakes with the filling - it would probably give a nicer finish. You know, provided the cupcake didn't explode ;)

And here are the super-cute heart-shaped sprinkles and red jimmies I used, available at bakingpleasures.com.au (they don't know I exist, except that by the end of the year I will probably have just about paid off their mortgage!), which is also where I got the red and black cupcake wrappers from.

And here they all in rows.

And because it was getting dark, and because I also think I need glasses now, I have included another photo because one seemed too blurry. Except now that that one looks blurry, too... yep, time to visit the optometrist!

Don't forget to comment on the recipe format, even if you don't have a Google account. Thanks! :)